Main Points
- Self-installing solar panels can save homeowners between 30-50% of the total system cost, compared to hiring professionals. The technological improvements in 2026 have made the DIY process more user-friendly than ever before.
- The SunPower Flex 400W Kit is the most efficient (25.3%) consumer DIY option currently available, while the EcoFlow PowerStation is the easiest-to-use option for beginners.
- Two new types of solar panels, bifacial and perovskite, have changed the solar industry by improving efficiency by up to 30% in comparison to traditional panels.
- The federal government is still granting a 30% tax credit for DIY solar installations through 2026. Additionally, 37 states offer their own incentives.
- Proper system sizing is key. The average home in 2026 needs a 5-10kW system to achieve notable energy independence.
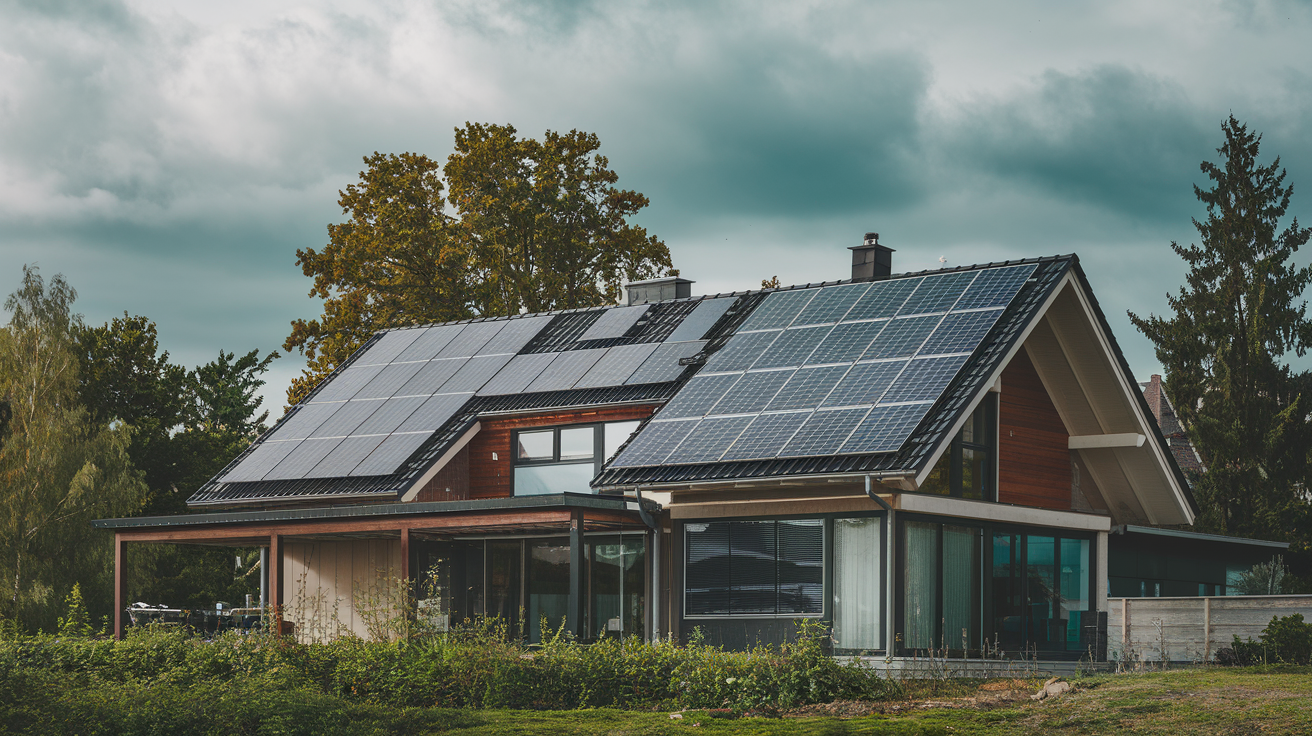
As we head into 2026, the solar industry has changed dramatically. DIY installations have become a viable option for homeowners who want to achieve energy independence. With panel efficiencies now over 25% and the installation process simplified using modular systems, there has never been a better period to harness the power of the sun on your own. The best DIY solar setups can now compete with professional installations in terms of quality, while saving homeowners thousands of dollars in installation costs.
With the cost of energy on the rise and advancements in solar power technology, it’s no wonder that DIY solar is becoming more popular. The average American home can offset between 80-100% of its electricity needs with the right-sized system, which could result in savings of $50,000-$100,000 over the course of a lifetime. Plus, with new plug-and-play systems available this year, even those with little technical know-how can install their own systems.
DIY Solar Power Cost Calculator
Calculate the estimated cost and components needed for your DIY solar power system. Choose a preset configuration or customize your own based on daily energy needs.
Best DIY Solar Projects for Homeowners in 2026
DIY solar projects have taken off in recent years, offering options from simple portable power stations to comprehensive whole-house systems. Whether you're looking to power a workshop, reduce your monthly electric bill, or achieve complete energy independence, there's a DIY solar project suited to your needs. The key is matching your technical skill level with the appropriate project complexity while considering your energy goals. Most homeowners begin with smaller projects before tackling comprehensive home systems.
Grid-tied systems remain the top choice, offering homeowners a way to reduce costs while maintaining a connection to the utility for backup power. These systems have become a lot easier to install, with microinverter technology getting rid of complex DC wiring. For those who want total independence, off-grid systems that come with battery storage have seen a major drop in price. Lithium iron phosphate batteries now provide 5,000+ cycle lifespans and cost almost half of what they did just three years ago.
Top 5 DIY Solar Kits to Look Out for in 2026
The market has evolved greatly and now offers pre-designed solutions that deliver high-quality, simplicity, and affordability. These complete kits include all the necessary parts - panels, mounting hardware, inverters, and in some cases, batteries - with detailed instructions that are designed for homeowner installation. The best kits find a balance between top-quality parts and a simple design, with manufacturers finally realizing that the quality of the instructions is just as important as the quality of the parts for DIY success.
1. SunPower Flex 400W Kit: Ideal for Novices
The SunPower Flex kit is a dream come true for the do-it-yourself enthusiast, boasting the best monocrystalline panels in the industry, which now achieve an unheard-of 25.3% efficiency. The 2026 model comes with their state-of-the-art "Click-Connect" wiring system, which removes the need for crimping tools or an extensive understanding of electrics. Each kit includes four 400W panels, microinverters already mounted on each panel, and an easy-to-use mounting system that fits most roofs without the need to drill holes. The included monitoring system connects straight to your home's WiFi, giving you real-time production data and troubleshooting help via their easy-to-use smartphone app.
What really makes the SunPower Flex stand out is its expandability - you can start with the base 1.6kW system and add extra panels without having to redesign the whole setup. The $2,800 price tag ($1.75/watt) is a great deal considering the high-quality panels and the effortless installation process. Most people say they were able to install it in just one weekend, even if they had never done any electrical work before. The only downside is that it doesn't work with many batteries, but SunPower says they're going to come out with their own storage solution later in 2026.
2. EcoFlow PowerStation 2000W: Best All-in-One System
With the EcoFlow PowerStation, the entry-level solar market has been revolutionized. This weatherproof unit, the size of a small cooler, combines an inverter, charge controller, and battery storage. The 2026 model comes with a 2000W output capacity (4000W surge), 2.5kWh of LFP battery storage that can be expanded to 10kWh, and it is compatible with any standard solar panels up to 1200W input. The system is designed to be plug-and-play, requiring no electrical work beyond connecting panels and plugging in appliances, making it excellent for those who find traditional solar wiring intimidating. The system automatically manages power flow between panels, battery, and connected loads, and provides detailed monitoring through their redesigned smartphone interface.
"I set up the EcoFlow system to provide power to my home office and essential circuits during power outages. It took me less than 2 hours to set up the entire system, and it's been providing 90% of the energy I need for my daily work. During our most recent power outage, we were able to run the refrigerator, lights, and internet for 36 hours without any problems." - Michael K., a homeowner in Vermont.
3. Tesla PowerWall DIY Edition: Best for Energy Storage
The renewable energy world was taken aback when Tesla finally released a DIY-friendly version of their popular PowerWall system. The DIY Edition retains the same 13.5kWh capacity and 7kW output as the professional version, but it includes simplified connection terminals, step-by-step installation guides, and compatibility with most third-party solar panels and inverters. The integrated Gateway system allows homeowners to monitor and control the energy flow between the solar, battery, and home circuits through Tesla's renowned app interface. At $8,500 per unit ($630/kWh), it's not the most affordable battery option, but the perfect integration, 10-year warranty, and Tesla's dependability make the premium worth it for many homeowners.
4. Renogy 800W Off-Grid Kit: Best Budget Option
Renogy is still the king of affordable solar with their updated 800W off-grid kit that offers a great balance of cost and quality. The 2026 model includes four 200W monocrystalline panels (21% efficiency), a 40A MPPT charge controller, 1500W pure sine wave inverter, and full mounting hardware - all for only $1,399 ($1.75/watt). It doesn't come with batteries, but it will work with almost any 12V or 24V battery bank. What sets this kit unique is Renogy's greatly improved installation manual, which now has QR codes that link to detailed video tutorials for each step of the installation.
On average, the system produces around 3.2kWh per day. This is sufficient to power the essential appliances in a small cabin or RV, or to provide supplemental power to specific circuits in a home. Many buyers have commented on the durability and value of the kit, although some have noted that the cables included in the kit could be of better quality. For those who are willing to start with a small system and steadily expand it, this is the most affordable way to get started with DIY solar without having to compromise on the quality of the main components.
5. SolarEdge Ready-Set-Solar 5kW System: Perfect for Powering Your Entire Home
For homeowners who want a complete solution without the need for professional installation, SolarEdge has finally entered the DIY market with its Ready-Set-Solar system. The 5kW kit comes with 12 high-efficiency panels, SolarEdge's famous HD-Wave inverter with power optimizers for each panel, and their new easy-to-use rail mounting system. What sets this system apart is the included electrical design package with pre-engineered wiring diagrams customized to your home's specific panel layout. The power optimizer technology delivers maximum energy harvest even with partial shading and allows for panel-level monitoring for easy troubleshooting.
At a cost of $8,200 ($1.64/watt) before incentives, this is the best deal for whole-home systems, although it does require some technical skill and basic electrical knowledge to install. The system can be expanded up to 11kW and works readily with most battery solutions, including Tesla PowerWall and Enphase IQ batteries. Most importantly, SolarEdge's upgraded safety features, including rapid shutdown compliance, ensure that the system meets all 2026 National Electrical Code requirements, which is especially important for larger DIY installations.
Investing in New Solar Panel Technologies
Bifacial Panels: Increase Energy Production by 30%
The bifacial solar technology has achieved major progress, with the 2026 models capturing up to 30% more energy due to their dual-sided design that harnesses the reflected light from the surroundings. Instead of the traditional opaque materials, these panels have transparent backing, which allows the sunlight to pass through and reflect from the roofing materials or ground covers back to the rear side of the panel. The technology is especially effective when installed on highly reflective surfaces, including white roofs or ground-mounted systems over light-colored gravel or snow.
Bifacial panels might be more expensive than traditional panels, with a 15-20% price increase, but their increased power output often means a quicker return on your investment. This is especially true in northern climates where snow coverage is seasonal. Canadian Solar and JinkoSolar are leading the consumer bifacial market. They offer models that are specifically packaged for DIY installation. These models include simplified connection systems capable of handling the extra power output without needing upgraded inverters or wiring.
Perovskite-Silicon Tandems: Establishing New Standards for Efficiency
Following years of research and development, perovskite-silicon tandem cells have at last hit the consumer market. They offer homeowners an unheard-of efficiency nearing 30% - almost twice the standard from a mere five years ago. These state-of-the-art panels utilize a thin film perovskite layer on top of traditional silicon cells, enabling every layer to absorb different parts of the solar spectrum. The end result is a significant increase in power from the same roof area, a breakthrough for homes with limited space for installation.
Companies such as Oxford PV and SunPower are leading the way with tandem panels that are available for consumer purchase. These panels are more expensive than traditional panels, costing between $2.50 and $3.00 per watt, but they are an excellent choice for installations where space is limited. Early users of these panels have found that they outdo traditional silicon panels by 25-35% under normal conditions. Another advantage of these panels is that the perovskite layer performs very well in cloudy conditions. This reduces the fluctuation in production that has been a problem for solar energy systems in areas where there is less sunlight.
Lightweight Flexible Panels for Unique Installations
Flexible panel technology has evolved from novelty to a practical solution with 2026 models achieving both impressive sturdiness and effectiveness ratings above 21%. These ultra-lightweight panels (typically 80% lighter than glass-fronted models) can be installed on surfaces unable to support traditional panels, including metal outbuilding roofs, curved surfaces, and even specialized fabric structures. Leading manufacturers now offer peel-and-stick versions with integrated adhesive backing that eliminates the need for mounting hardware entirely, dramatically simplifying the installation process.
The latest FlexMax series from Renogy and SunPower's ultralight residential line stand out as the most durable, efficient, and cost-effective options in this category. Their flexible panels come with improved UV stabilization that resolves the degradation problems that were common with previous flexible technologies. For home DIYers working on unique installations or those worried about adding weight to old roof structures, these products offer new opportunities without jeopardizing performance.
How to Install Your Own Solar: A Step-by-Step Guide
Determining Your System Size and Layout
The first step in correctly sizing your system is to understand your energy needs. This can be done by conducting a detailed analysis of your electrical consumption. Start by collecting 12 months of utility bills. This will help you identify your average monthly usage and any seasonal patterns. Most homes require a solar capacity of 5-10kW to offset a significant amount of their electricity use. However, this can vary greatly depending on location, energy consumption, and available installation space. Online calculators have become quite accurate, with the National Renewable Energy Laboratory's PVWatts tool updated for 2026 efficiency ratings being the most reliable.
After you've figured out how much capacity you need, it's time to start planning your layout. You'll need to think about the direction your roof faces (south is best if you're in the northern hemisphere), whether there are any trees or buildings that might cast a shade over your panels, and whether your roof can support the load of the panels. A lot of DIYers use Google Earth Pro to get the measurements they need, and then use SolarDesignTool.com to create a professional-looking plan that shows exactly where each panel should go. Don't forget that most roofs can handle a standard solar installation without needing any extra support. But if you're planning to install more than 20 panels, you might need to get your roof checked out, especially if your house is quite old.
2. DIY Solar Water Heaters
Solar water heaters are a great investment in renewable energy and often pay for themselves in less than three years. The latest DIY models use evacuated tube collectors that work well even in freezing weather. Each tube can heat 5-10 gallons of water by 40-60°F on a sunny day. The 2026 models have better heat transfer materials and simpler circulation systems, so they don't need the pumps and controllers older models used.
Usually, the installation process includes fixing the collector panel on a wall or roof that faces the south, linking it to an insulated storage tank, and running insulated piping between the two. The ThermaSol DIY kit has emerged as the clear frontrunner, as it contains everything necessary for a full installation that can provide as much as 80% of the hot water that a typical household uses. A lot of homeowners use these systems in conjunction with their current water heaters, which only turn on when there isn't enough solar heat, creating a flawless hybrid system that maximizes energy savings while ensuring a consistent supply of hot water.
3. Solar-Powered EV Charging Stations
"My solar carport generates enough power to drive my electric car around 40 miles each day - essentially making my daily commute cost-free and carbon-free. The system paid for itself in just 3.5 years when factoring in both the eliminated gasoline costs and the reduced home electricity bills." - Sarah J., Colorado
Electric vehicles are no longer a thing of the future, they're here to stay. For those who are conscious about the environment, a solar-powered charging station is a perfect DIY project. A basic system will require 1.5-2kW of solar capacity to provide enough energy for approximately 30-40 miles of daily driving. The ideal configuration would be to have bifacial panels mounted on a carport or pergola structure, this way they can generate power while simultaneously providing shelter for the vehicle.
SolarEdge and ChargePoint have teamed up to produce the HomeCharge DIY kit, a system that combines solar power generation with smart EV charging. The system is designed to adjust charging speeds based on solar power production, making sure that cars are charged mostly using solar power instead of grid power. The kit also comes with a smart controller that can be set to focus on charging during peak solar power production times or to save power for home use during times of high demand.
For the best results, you might want to think about using the charging station with a small battery bank (2-4kWh capacity) to keep any extra power you generate during the day for charging in the evening. The ZapStation kit comes with a 3.2kWh lithium battery that's the perfect size for this job, so you can always charge your devices, no matter what the weather's like or what time of day it is.
4. Solar Generators for Your Backyard
What was once a backup power source for emergencies has now become a versatile power hub capable of running everything from workshops to garden tools to outdoor entertainment areas. These all-in-one systems usually include 1-2kW of solar power and 2-5kWh of battery storage, with a variety of outlet types to power all your devices. Best of all, they’re portable and scalable – you can install them without a permit in most areas, and you can add on as your power needs grow.
The Bluetti PowerOasis is the cream of the crop in the DIY solar world, boasting four 270W panels in a fold-out array that connects to a weatherproof power station containing 4.8kWh of LiFePO4 batteries and a 3000W inverter. The whole system can be put together in less than two hours and produces enough power to run a small workshop, garden irrigation systems, or outdoor lighting for long periods of time. For those with less demanding needs, the Jackery Solar Generator 2000 provides a more compact alternative that still packs a punch for occasional use scenarios like camping, tailgating, or emergency backup.
Fixing Everyday DIY Solar Issues
Even the best laid plans for DIY solar installations can run into performance hiccups. Knowing how to spot and fix common issues will keep your system running at full power for its entire life. Most issues fall into three categories: electrical connections, environmental factors, and component failures. With a basic testing kit and a logical approach to troubleshooting, most issues can be fixed without calling in the pros.
How to Troubleshoot Power Output Problems
If your system is not producing as much power as it should be, the first thing you should do is check your monitoring system for data on the performance of each panel. If you see a significant difference between panels that are otherwise similar, it may be due to shading, dirt build-up, or a possible defect in the panel. Use a multimeter to check the voltage and current at different points in the system, starting with the panels and working your way to the inverter. This will help you find where the problem is. If you have a modern system with microinverters or power optimizers, you can use their apps to monitor each panel individually, making it easier to find any that are not performing as well as they should be.
Protecting Against Weather
Water getting in is one of the main reasons DIY installations fail. All holes in the roof need to be sealed with the right flashing and weatherproof boots, and electrical connections need the right weatherproof junction boxes that are rated for outdoor use. Frequently check these parts, especially after bad weather, to find any problems before water damage happens.
To safeguard your solar system, use UV-resistant silicone sealant around junction box covers and dielectric grease on all electrical connections to avoid corrosion. The Tigo Energy weatherproofing kit is a popular choice with do-it-yourself enthusiasts because it provides a complete solution for junction box and connector protection, including specially designed sealants and connection covers for solar applications. It's important to remember that good weatherproofing isn't merely about immediate functionality, but also about guaranteeing the system's long-term reliability and protection over many years of operation.
Keeping Your Batteries in Top Shape
Just like any other part of your solar power system, your batteries need regular care to keep them working their best and lasting as long as possible. If you're using a lithium-based battery system (which most people are these days), you should keep an eye on the battery control system to make sure the cells are balanced and the temperature is regulated. A lot of the newer systems let you do this from your phone, so you can catch any problems before they turn into big problems. To keep your batteries from wearing out too quickly, try not to let them discharge below 20% very often, and set up your system to use solar power to charge the batteries whenever it can instead of using power from the grid. Even if your lithium batteries are supposed to be maintenance-free, it's still a good idea to do a capacity test every season to see how they're holding up and figure out when you'll need to replace them.
Begin Your Solar Adventure Now
DIY solar has never been more attainable, with technological improvements and price reductions making it possible for homeowners of all skill levels to tap into clean, renewable energy. Whether you start with a basic solar generator or take on a full home system, the pleasure of generating your own electricity combined with major financial savings makes solar one of the most gratifying home improvement projects out there. The best diy solar solution for you depends on your energy requirements, technical comfort level, and available installation space – but with the wide range of options now available, there's truly something for everyone.
As you take your first steps into the world of renewable energy, remember that you're not alone. The solar community is extremely supportive, and there are online forums like DIYSolarForum and Reddit's r/SolarDIY that provide useful advice from experienced installers. Manufacturers have also stepped up their game and have dramatically improved their support resources specifically for DIY customers. By careful planning, quality components, and attention to detail during installation, your solar system will provide decades of reliable, clean energy and protect you from rising utility costs.
Common Questions
With the DIY solar industry rapidly changing due to new products, technologies, and regulations, it can be hard to keep up. Here are some of the most common questions people have when considering a self-installed solar project in 2026. While the landscape will continue to evolve, these basics will give you a good starting point for your research and planning.
Don't forget that local laws and incentives can vary greatly depending on where you live, so be sure to check the current requirements with your local building department and utility company before you start any installation. Many utility companies have created simplified processes specifically for DIY installations, as they have recognized the increasing number of people who are installing these systems themselves in the residential market.
What kind of savings can I expect from a DIY solar installation compared to hiring a professional?
Generally, you can expect to save between 30-50% by installing your own solar system compared to hiring a professional. The average cost of a 5kW system is between $7,500 and $10,000 if you do it yourself, while a professional installation can run between $15,000 and $20,000. The primary savings come from not having to pay for labor, which accounts for about 35% of the cost of a professional installation. You can also often find better deals on components than those included in professional installation packages, especially if you buy during sales or direct from the factory.
How much you save will depend on how big your system is, how complex it is, and how comfortable you are with different parts of the installation. Many people who like to do things themselves choose a blended approach. They do the mechanical installation themselves and hire an electrician to do the final connections and help with permits. This approach still saves a lot of money and makes sure the important electrical work is done right. When you figure out how much you might save, think about how much your time is worth. A typical do-it-yourself installation takes 40-80 hours of research, planning, and installation work for a regular home system.
What are the must-have tools for a DIY solar installation?
There are several standard and specialized tools that are necessary for a successful DIY solar installation. For mechanical mounting, you will need a drill with various bits, a socket set, a tape measure, a chalk line, and safety equipment, including fall protection if you are working on a roof. For electrical work, you will need wire strippers, crimpers, MC4 connector tools, and a quality digital multimeter that can measure both DC voltage/current and continuity. A sunlight irradiance meter is also helpful for system testing and troubleshooting, as it can help you verify panel performance against expected output based on current conditions.
Type of Tool Must-Have Tools Estimated Price Mechanical Drill, socket set, level, stud finder $150-300 Electrical Multimeter, wire strippers, crimpers, MC4 tools $100-250 Safety Roof harness, gloves, safety glasses $200-400 Specialized Irradiance meter, angle finder, voltage tester $150-300 Many do-it-yourselfers find it cost-effective to rent tools or borrow from local tool libraries, especially for specialized equipment that is only used during installation. In addition, several companies now offer all-in-one solar installation tool kits that contain all the necessary specialized tools. These kits usually cost between $200 and $400, depending on their quality and how comprehensive they are. The kits usually include illustrated guides that show how each tool is used during the installation process, which may be especially helpful for people who are installing solar panels for the first time.
Can I use a DIY solar kit in my apartment or rental property?
For those of you who rent or live in an apartment, there are more and more options for solar energy. Portable solar options with non-permanent installation methods are becoming increasingly popular. A balcony solar system that uses 100-400W of panel capacity with microinverters can be plugged directly into a standard outlet (if your local codes allow it) to offset some of your apartment's electricity usage. These systems are typically mounted with non-penetrating clamps or weighted bases so they won't damage the property. This makes them a great option for renters who aren't allowed to make permanent modifications to their homes.
If you're a renter with a yard, a freestanding ground mount system is another option you can take with you when you move. The Renogy Ground Mount Kit is popular with renters. It supports up to 800W of solar capacity and is built on a sturdy aluminum frame that doesn't require concrete footings. Before you install any solar equipment at a rental property, check your lease and get your landlord's written permission. More and more landlords are becoming open to temporary solar installations, especially those that don't require changes to the structure or electrical system.
Do I need to be an electrician to install my own solar system?
While having a background in electricity can be useful, many modern solar kits are designed with the DIYer in mind, even if they have little experience with electricity. Systems that are plug-and-play and use microinverters or AC modules have taken away much of the complex DC wiring that used to need specialized knowledge. These systems connect components using keyed connectors that can only be assembled one way, greatly reducing the chance of wiring errors. The critical connection to your home's electrical panel, however, should only be performed by a licensed electrician unless you have specific experience with electrical service work and understand local code requirements.
Most do-it-yourself enthusiasts are able to finish 90% of their installation on their own, then they hire an electrician for an hour or two to make the final connections and inspect the system. This approach is a good balance between saving a lot of money and preserving safety and code compliance. If you're going to try a completely independent installation, take the time to understand basic electrical concepts like series/parallel connections, the right wire sizing, grounding requirements, and safety procedures for working with photovoltaic systems. You can get a good foundation of knowledge for DIY installers from online courses from places like SolarEnergy.org at reasonable prices.
What is the expected lifespan of today's DIY solar panels?
If you install solar panels in 2026, you can expect them to come with a performance warranty of 25-30 years. This warranty guarantees that the panels will still be able to produce 85-92% of their original output after 25 years of use. However, many solar panels will actually last much longer than their warranty period, frequently producing a considerable amount of energy for over 35 years. Of course, their efficiency will gradually decrease over time. Solar panel manufacturers have made great progress in the past ten years, and most panels now feature double-glass construction and improved encapsulation materials, which greatly increase their durability.
Other parts of the system have a shorter life span: string inverters usually last 10-15 years, while microinverters and power optimizers usually have 25-year warranties that match the panel durations. Battery systems vary a lot, with lithium iron phosphate (LFP) batteries now commonly warranted for 10 years or 6,000+ cycles. When you're planning your system, you should factor in one inverter replacement for string inverter systems, while microinverter systems can reasonably be expected to work through the entire panel lifespan with minimal maintenance requirements.
For the best long-term results, choose parts that are durable and can withstand the elements. Follow the manufacturer's instructions for installation and check regularly for any signs of water damage, connection issues, or problems with the mounting system. If you install a DIY system correctly and use top-quality parts, it should last for many years and require little maintenance. If you live in a dusty region, you may need to clean the panels from time to time.
It is important to monitor your solar system's performance every year to detect possible issues before they become big problems. Most of the latest systems come with monitoring features that keep track of production and can notify you of sudden performance decreases that may signify issues on the horizon. It's important to deal with any major performance changes quickly to avoid a domino effect of failures and to get the most out of your solar investment.
Don't forget that solar panels generate eco-friendly, sustainable energy that minimizes your carbon footprint while offering financial advantages through decreased utility bills and possible incentive schemes. With the correct installation and upkeep, your DIY solar system is both a pledge to the environment and a wise financial investment that will keep on yielding returns for many years.